Showing posts with label parsi dish. Show all posts

Wednesday, 1 January 2020

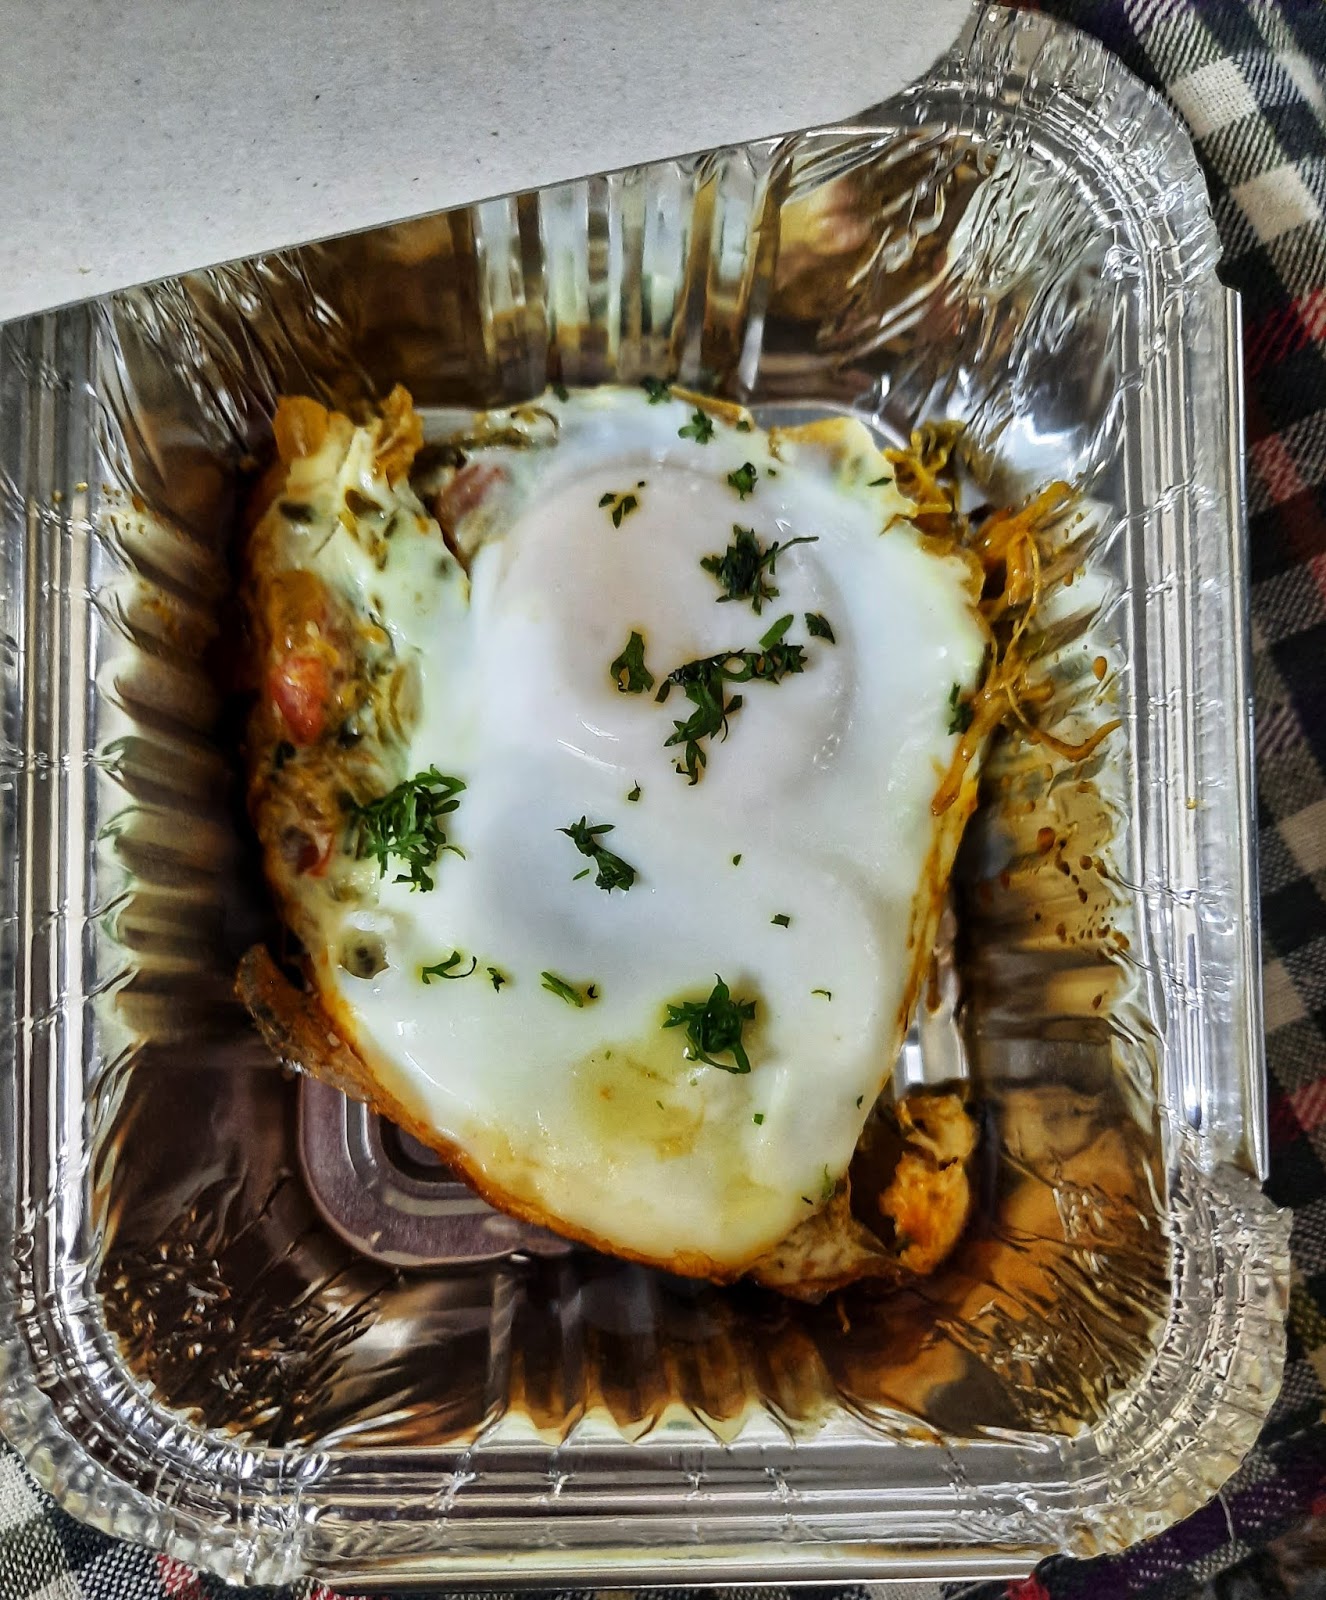
Parsi Recipe - Methi par Eedu, Eggs with Fenugreek


Hello.

Wishing all my readers and recipe lovers a very happy and prosperous 2020. May it be a healthy one filled with good wholesome food. Cooking with love for your family be your priority and may you cherish each meal moment with them.

Methi par eedu


Today was the first day of 2020. And I wished to pack my husband tiffin with something easy and freshly cooked. This recipe of Bhajji per eedu took 20 minutes to prepare. I got it done while he was reading his morning paper over a cup of tea.

Methi par eedu


Actually, the combination of vegetables with protein is the best option in a Parsi household. I used small methi (fenugreek). It is slightly bitter but very nutritious.

For Methi Par Eeda Recipe with two eggs

Ingredients 


2 cups fenugreek (washed and cut)
2 eggs
1 bunch spring onions
1 tbsp oil
2 tomatoes
1 chopped green chilly
1/2 tsp ginger - garlic paste
1 tsp red chili powder
1/2  tsp cumin powder
1 tsp coriander powder
1/2 tsp turmeric powder
1 tsp white vinegar
A small piece of jaggery
1 tsp chopped coriander leaves
Salt to taste


Method


1 Wash and finely chop the methi leaves. Chop spring onions and tomatoes too.

2. Heat oil in a deep non-stick pan. Add onion bulbs and sauté till pinkish in color.  Add chopped chilies and ginger garlic paste. Stir for another  30 seconds.

3. Now add the methi leaves and spring onion greens and stir on low flame for 2 to 3 minutes

4. Now add the chopped tomato, salt, chili powder, cumin powder, and coriander powder, mix and cook for 1-2 minutes.

5  The fenugreek and tomatoes will leave the water and cook in itself. Cover and cook, it will take lesser time.

6  Gradually add the vinegar and jaggery and mix it well. Cover and cook on low heat till water dries.


7. Now transfer the mixture into a flat non-stick pan and it spread evenly. Place the pan on heat.

8. Break the eggs, one by one. See that the yolks don't split. Keep some distance between the two eggs

9. Place a lid on the pan. And add a little water on top of the lid.  Cover and cook 3-4 minutes.

10. Open the lid, sprinkle salt and chopped coriander leaves.

11. Cut a slice with the egg. Serve with hot chappatis and ketchup.


Note


If you feel the methi is burning at the bottom, add a little water before topping it with eggs

You can beat the eggs and add the layer of beaten eggs as an option. This gives a more even finish.

Add a tablespoon of ketchup while cooking the fenugreek leaves if you enjoy a sweet taste to your dish.

You can also check wafer par eedu recipe here

Monday, 8 April 2019

HOW TO MAKE PARSI STYLE RAVO/SEMOLINA

HOW TO MAKE  PARSI STYLE RAVO/SEMOLINA 


Happy occasions call for sweet preparations being made at home. Parsi style Ravo is definitely one of the dishes made in our household.  dessert recipe at home. Parsi Style Ravo is prepared with semolina, milk and dry fruits.
I remember my grandmother telling me that she used to add an egg while cooking the rava with milk.

Parsi Style Ravo


This sweet dish needs to be cooked on slow flame while constantly stirring it. It has a creamy texture and looks like porridge. Garnish lavishly with nuts and raisins and its set to get served.  Also, use a very fine grain of Semolina to enhance the texture.


Ingredients - Makes 6 helpings

1 cup semolina (rawa)
1 1/2 cup sugar
1 cup butter/ ghee
3 cups of milk
2 cups of water
Few strands of saffron
2 tbsp Rose water
1/2 cup charoli/ raisins/ nuts


Method

1. Soak the saffron in a little water before you start preparing.

2. Take a heavy bottom pan or kadai. Add the ghee leaving one teaspoon for roasting the nuts. Heat the ghee on low flame.

3. Now add semolina and stir it well. Roast the Ravo till it lightly changes colour and emits a nice nutty aroma.

4. Now, pour water in it along with sugar and stir the mixture continuously. Cook until mixture becomes thick.

5. Add saffron and rose water at this stage.

6. Now add the milk stirring continuously on medium flame.


7. Cook the mixture until ravo thickens like a soup consistency. Turn off the gas. The mixture will further thicken on cooling.


8. In another frying pan, take one teaspoon ghee and roast the raisins and nuts.


9. Now serve Parsi Style Ravo garnished lavishly with charoli and kismish.

Note

Do not add Cardamom to this dish or it will taste like Sheera. Too many ingredients spoil the taste. Rose water and saffron are just perfect for Parsi Ravo recipe. You can add vanilla essence instead of rose water.

Parsi style  Ravo


This is my grandmother's recipe and I am happily sharing it with you all.


Friday, 25 January 2019

Wafer par Eedu - Eggs on Potato Chips


Today's recipe is a special Parsi Recipe. We, Parsis love our eggs in any form. Omelettes, scrambled, sunny side up but best of all we love our eggs on something. Eg- Bhaji par eedu, bhindi par eedu but best of all, if no vegetable is available. We grab a packet of Wafer/Salli and throw some eggs on it, then we happily savour our Wafer par eedu (egg on potato wafers/ sticks) 

Wafer par eedu


Parsi Wafer par Eedu is simple to make and so delicious!  The best part of this recipe is that there are no specific ingredients, you can add or minus according to what is available in your kitchen. But the technique is more important to get that perfect flat wafer par eedu that can be enjoyed as a starter, snack or during meal time.


Ingredients


1 teaspoons oil

Half cup water
250 gms potato chips
1 small green chilli
Salt to taste
1 tsp pepper powder

4 egg
2 tsp chopped coriander leaves

1/2 tsp paprika
1 tbsp tomato ketchup ( optional)


Method


1.Take a medium sized frying pan. Switch on the gas, once the pan is hot, lower the flame. Add the oil and water. 

2. Add the wafers/potato chips to dish. 

3. Add the chopped chilly, salt, half tsp pepper and tomato ketchup. Don't add too much salt as wafers already have salt content. 

4. Gently mix this with the soft wafers and gently push down so that there aren't any huge gaps in the wafers and you get something of an even base.

5. Add some chopped coriander leaves to the top of the wafer mix. 

6. Before cracking the eggs on top, see to it that the wafer mixture is not completely dry as we don't want it to burn at the bottom.  Add water if need be. 

7. Now break four eggs on top of the wafers. Sprinkle salt, pepper, paprika and coriander leaves. 

8. Cover with a lid and continue cooking on low-moderate heat for 3-4 minutes.

9. Continue cooking until the egg white is no longer transparent in colour and has turned white. Switch off the gas when eggs are semi done as they cook in heat when the flame is turned off. 

10. Serve the dish immediately. A cold wafer par eedu will not taste as yummy. 


Note
You can beat the eggs too, instead of putting the whole eggs on the wafer mixture. 

Now enjoy your Wafer par eedu hot and with a dash of ketchup.  Coz I believe that Khavanu, Peevanu, Majje ni life!!

Top post on IndiBlogger, the biggest community of Indian Bloggers

Monday, 10 December 2018

Parsi Style Chicken Kheema

Hello friends,

"Kheema" or "kheemo" as they call it in a  Parsi household is a dish loved by all members of the family. No one can refuse a spoonful of this mince served with salli and buttered bread. You can even make a kheema per eendu( egg over the mince). It is generously cooked with spices and tempered on slow till well cooked and tendered.


Parsi style kheema (mince)


 Mutton mince is the best option, but with doctors orders to avoid mutton mince,  I have turned to chicken mince nowadays. It turns out equally delicious and iis perfectly okay if you lick your fingers on the dining table after relishing this. So note down the ingredients and stir up this dish today.


Ingredients

2 onions - chopped
1 tbsp oil
1 green chilly
1 tsp ginger garlic paste
3 tomatoes - chopped
1/2 tsp red chili powder
1/4 tsp turmeric powder
1/2 tsp garam masala powder
250 grams chicken kheema
I potato - cubed
Half cup shelled peas.
Salt to taste
Coriander leaves for garnish
Handful of whole spices (peppercorns, cinnamon sticks, cardamom, cloves)


Instructions

1. Take a deep bottom pressure cooker pan. Add oil and heat.

2. Now add the whole spices and chopped onions.  Sauté for 3-4 minutes till the rawness of onions go away.

3. Now stir in the ginger garlic paste and green chilly

4. Further sauté until the onions become golden.

5. Add the pureed tomatoes and sauté until they soften. The oil will be seen on the sides. This shows that the tomatoes are cooked.

6. Now add the chili powder, masala powder and cook for another 1-2 minutes.

7. Wash the chicken mince well, now tip it in the pressure cooker pan with turmeric and salt.

8. Add the chopped potato and shelled peas.


9. Lower the flame on the stove and cook until the masalas are all mixed well with kheema and vegetables.

10.  Now add a little water, shut the lid and pressure cooker this for one whistle.

11. Lastly, dry the liquid in kheema if any. Add the coriander leaves and stir well.

12.Take off the stove and serve it hot with buttered pavs, salad and  a dash of lime.


I missed to order Salli ( potato sticks ) that day but never forgot to butter my pavs.


Top post on IndiBlogger, the biggest community of Indian Bloggers

Friday, 5 October 2018

Bheeda per Eendu - Parsi recipe of eggs baked over Okra

Hello friends,

My experience of making bhinda per eedu dates back to my early marriage days when I just knew just a few dishes to cook. And this dish was a life saver.
Okra or lady's finger (Bhindi) have to be first well cooked and before serving the dish,  the okra is topped with a well-beaten layer of eggs and a lavish bhabraving (sprinkle) of pepper and coriander leaves.

Bhindi per eedu


 Bhinda per eedu is the best way to get your family to relish vegetables and enjoy the protein of eggs. We bawas love eggs at any meal.

Note the ingredients and get those eggs cracking.

Ingredients

250 gms Okra ( bhindi)
3 Eggs ( beaten)
1 Tomato (chopped)
1 Onion (chopped)
1/2 tsp ginger garlic paste
1/2 tsp Black Pepper
1 tsp red chilly powder
1/2 tsp garam masala
A dash of lime
Few coriander leaves
Salt (to taste)


Method


1. In a frying pan, add the oil, chopped onion and saute till brown.

2.  Add ginger garlic and saute further till the raw aroma is gone.

3. Add the chopped okra and stir up for two minutes.

4. Now add dry masalas and cook well. Add the chopped tomatoes and continue cooking.

5. Add salt and lime juice at this stage. Cook the orkra till soft and is cooked.

6. Now beat the eggs with salt and pepper.

7. Use the back of your spoon to even out the cooked okra in the oiled pan, so that you have a flat base for the egg layering. Reduce the flame to low.

8. Spread a layer of the seasoned eggs over the okra mixture in the pan.

9. Cover the pan with a lid and let the eggs cook on a low flame for about 10 minutes, till they are done.

10. Garnish with coriander leaves.

11. Serve it hot with roti ketchup and saali on the side.


Note

1. Sometimes you can crack a whole sunny-side-up egg over the bhindi to create a more wholesome meal.

2. Cook the eggs on a low flame so that the okra doesn’t burn at the bottom of the pan. But trust me, sometimes a  crispy layer of orka at the bottom tastes very yummy.

3. You can even bake the egg layering procedure in an oven.


Wednesday, 23 May 2018

Vegetarian Dhansak Dal Recipe

Hello friends,

I have been getting many requests from my vegetarian foodie friends to share a veg version of the dhansak daal. So here I am today to cook up an equally tasty vegetarian masala dhansaak dal you can savour with brown rice and cacchumber.

Dhansak Dal and rice


There is alot of nutrition value in the dal due to the added vegetables so don't  strain out the dal after boiling to retain all the fibre.


Ingredients

For Dal 

1 cup tuvar dal
1/2 cup masoor dal
1/2 cup channa dal
1 potato
1/4 doodhi ( bottle gourd)
1 meduim sized brinjal
1 small piece of pumpkin
2 large tomatoes
2 green chillies
1 tsp ginger garlic paste
1 tsp kasturi methi

Masalas

2 tsp Dhansak masala (Everest or any other brand)
1 tsp garam masala powder
1 tsp red chilli powder
1/2 tsp turmeric powder
1 tbsp ghee/oil
2 tbsp tamarind paste
1 chopped onion
Salt to taste
A dash of vinegar and sugar ( optional)


Method

For the dal

1. Wash all the dals and let it soak for an hour minimum.

2. Chop the veggies except onions and add to dal with salt, turmeric powder, green chillies and ginger garlic paste.  Add enough water to let them veggies be soaked.

3. Pressure cooker this for three to four whistles.

4. Let the cooker come to room temperature, open lid and grind all of this to a paste.


For the dhansak dal masala

1. Heat ghee in a pan, add finely chopped onions and saute them till they become transparent.

2. Add the dhansak masala, red chilli powder, garam masala and saute it for 3-4 minutes.

3. Now add the lentils and veggies blended paste mixture.

4. Let it simmer on slow flame for a 5-6 minutes and then add the tamarind paste.

5. Let it thicken, add a dash of vinegar and sugar.

6. Garnish with chopped coriander leaves.

7. Serve it with a onion/cucumber/ tomato salad and brown dhansak rice.

Dhansak Dal and rice


Top post on IndiBlogger, the biggest community of Indian Bloggers

Easy One pot Chicken Biryani

  Easy One pot Chicken Biryani  No fuss steps infact a one pot preparation with a flavourful outcome!  "Fall in love with the irresisti...