Showing posts with label indian cooking. Show all posts

Sunday, 31 October 2021

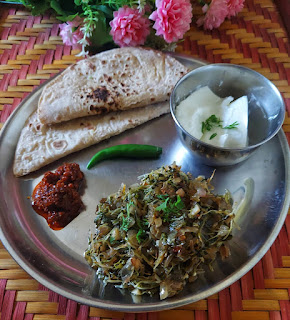
Small Indian Fenugreek Methi Bhajji Recipe

 Small Indian Fenugreek Methi Bhajji Recipe


 Sometimes even bitter tastes beautiful. 

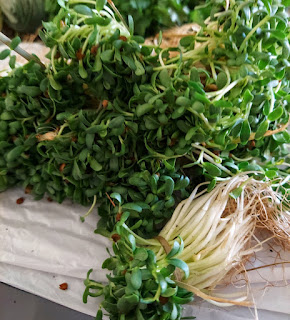
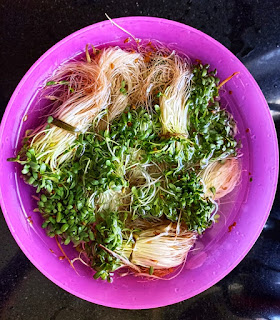
Fenugreek or Indian Small Leaf  Fenugreek is commonly used in Indian cuisine. Methi as they call it in hindi are microgreens rich in minerals, protein, potassium, zinc, and vitamin . It's also used for flavoring the various dishes.

Small Indian Fenugreek Methi Bhajji Recipe


It helps in controlling blood sugar levels as galactomannan, a natural soluble fiber present in Fenugreek slows down the rate of sugar absorption into the blood.


This Microgreens are relatively easy to grow on a small scale and can also thrive indoors if indirect bright light is available. It takes approximately 10 to 12 days to sprout into a stem and leaflets. 

For cooking it, you just need to cut off the root part, then wash and chop to cook it.  


This Methi Bhajji recipe is

Deliciously Simple

Nutritious 

Easy to Cook 

Just 5 ingredients 

Perfect as a main or side dish 


Methi leaves can be very bitter and even more bitter after cooking. The main way to eliminate the bitterness is to soak the methi bundles in salt water for half hour. Squeeze the salty water out and cook it later. 


Now for the 5 ingredients easy recipe 


Ingredients 


15 to 20 bundles of Indian Small Leaf Methi

2 medium sized onions 

2 Tbsp cooking Oil 

5 to 6 cloves of garlic 

2 slit green chillies 

Salt to taste

Small Indian Fenugreek Methi Bhajji Recipe


Method 


1. Soak the methi bundles in salt water. Let it soak for half an hour. Rinse the methi leaves very well in water. Drain all the water. 


2. Now snip off the roots, and chop the rest of it roughly.


3. Finely chopped the onion. 


4. Peel and chop the garlic too and keep aside. 


5. Now take a non stick or heavy bottom pan. Add oil to it. Let it heat and add onions.


6. Stir the onions and cook they are pinkish in color. 


7. Add the garlic and slit green chillies.


8. Lastly  Add the chopped methi leaves and salt to taste. 


9. Stir on high flame for 2 minutes. Then cover the lid and cook on low flame till water is dried up. 


10. Methi bhajji is ready to be served.  


This rustic, healthy and yet tasty recipe of an Indian style Methi Bhaji or Sabzi made with fresh Indian small leaf  Fenugreek makes a perfect meal with hot roti, curd pickle or can even be paired with dal-chawal. 


Thursday, 3 December 2020

Easy Pea Filled Khasta Samosas Recipe

 Lockdown has made us cook up the most exciting dishes including the street foods we cant go out and savour. I tried out the most amazing khasta coating samosas, but this time instead of adding the regular potato filling, I added a sweet and spicy peas filling. 


Easy Pea Filled Khasta Samosas Recipe


 *For the Samosa Coating*


2 cups Maida
1 tbsp Rawa
Few crushed peppercorns
1/2 tsp Ajwain
Salt to taste
2 tbsp oil
Water for kneading 


*For the peas filling*


1 cups green peas
2 tbsp oil
1/2 tsp red chilly power
1/2 tsp mango powder (amchoor)
Salt and Sugar to taste 


Method


1. Mix all the dry ingredients together. Then add the oil and slowly add water to knead into a stiff dough. Keep aside to use for stuffing.

2. Boil the green peas over medium heat with 1 cup of water, until peas are tender. Drain the water, squeeze the excess water. Take oil in a pan, add peas and mix all the dry ingredients to the peas, chili powder, garam masala, mango powder and salt. Mash till all water is dried up.
 

3. To make Samosas

Now make round small circles with the dough. Cut into half, roll into a cone. Stuff it with pea filling. Seal the end. Make all the remaining samosas like this.

4. Now heat oil in a Kadhai on medium flame and place the samosas in one by one . Fry till golden brown. Serve it Garma Garam with sauce at tea time. 


Also Watch the video to learn the recipe as I Make it.


This post is in association with #HomeChefMatters by FBAI (Food Bloggers India Association) in association with Godrej Cucina 

Thursday, 21 May 2020

Easy Gujarati Style Dal Dhokli Recipe


 Gujarati Style Dal Dhokli


Dal Dhokli is a traditional dish usually prepared in Gujarati as well as Rajasthani households. While in Rajasthan it is tempered with whole garam masala and is spicy the Gujarati version is sweet and tangy yet bursting with the right delectable flavours. 


Gujarati Style Dal Dhokli


 It is a wholesome meal made by simmering whole wheat flour bits in Dal along with various other spices and condiments. This one is prepared in my kitchen with the help and demonstration of Ms. Meena Parikh is a real pro at this dish. But guess what? My dish turned out so well, that I perfectly know how to make it again, thanks to this easy recipe.

Ingredients


For dal:
1 cup Toor dal (wash and soak for an hour)
4-5 cups water
1 tsp oil
1 tsp ghee
2 tbsp peanuts
1 tsp mustard seeds
½ tsp cumin/jeera
1 chili, broken
A pinch of asafetida ( hing)
1 tsp grated ginger paste
1/2 tsp turmeric powder
1 tsp lemon juice
¾ tsp red chili powder
½ tsp coriander powder
4-5 cloves
1 stick cinnamon
Small piece jaggery / gud
Salt to taste
Coriander leaves for garnish 

For the dhokli:

1 cup wheat flour / atta
¼ tsp turmeric
½ tsp red chili powder
½ tsp salt
2 tsp oil
Water for kneading


Method 


1. First put the toor dal in the pressure cooker with 2 cups of water, salt and turmeric powder for 15 minutes to cook till it’s mushy. 

2. Now knead the dhokli dough. Take a flat dish, add the atta, salt, chilli powder, turmeric powder, oil and slowly add water to knead into thick dough. Keep aside till dal is ready. 

3. Take a kadai and add the cooked dal, 2 to 3 cups of more water to it. Add the grated ginger, peanuts, jaggery ,  whole red chillies and 1 tsp lemon juice to the boiling dal. You will ask me, why is the dal so watery? well it is fr the dhokli to soak up the water and cook.


4. Now roll the dhokli dough like a chappati and cut it into rectangular strips as shown in the picture. 

5. Once the dal begins to a boil, drop in dhokli pieces one by one and give a gentle mix.


6. Let it simmer for 5 to 8 minutes.

7. Take a tiny vessel, add the half oil and ghee to it. Now to this heated oil add cumin and coriander seeds, Asafetida powder, cloves, and cinnamon. Switch off the gas, add coriander and chili powder to the oil.

8. Pour this over the dal and mix it well. By now the dal dhokli must have thickened by absorbing the water in the dhokli.

9. Lastly, add the chopped coriander leaves. 

Gujarati Style Dal Dhokli


10. Serve it hot with rice and a tall glass of chaas (buttermilk). Do not forget a squeeze of lime and a drizzle of delicious Desi Ghee before you sit for your meal to relish the Gujarati Style Dal Dhokli

Tuesday, 8 October 2019

Butter Garlic Crab Recipe


I have never cooked up a crab recipe on my blog before. In the past I have made crab curry with coconut and masalas. Today I decided to share the easy butter garlic crab recipe that I stirred up a few days back.
After the month of Shravan, the fish is in abundance in local markets and so are the crabs. Beautiful big crabs that have sufficient meaty substance in it and combined with spices give a delicious taste to the palate. 4 to 5 big crabs is all you need to make this dish.

Butter garlic crab recipe

First and foremost crabs need to be cleaned well. You can ask your Fisher lady to do it for you.


Ingredients 

4-5 big crabs
1 onion
1 sprig of curry leaves
6-8 chopped garlic
1 chopped green chillies
1 piece chopped ginger
2 tbsp butter
I tsp crushed pepper
Salt to taste 


Method

1.Clean the crabs well in running water and crack the pincers.

2. Boil enough water that will soak the crabs. Add curry leaves, chopped ginger and salt in that heavy bottom vessel. Now boil for 8 to 10 minutes till crabs turn white.

3. Switch off the gas remove only tye crabs and discard the rest.

4. Heat butter to the pan, add the  finely chopped onion and saute till pinkish.

5. Also add the chopped garlic, chopped green chillies and saute for 2 minutes.
6. Now add the boiled crabs and mix it in gently.

7. Add half cup water, cover the pan with a lid and let it simmer on slow flame for another 5 minutes.

Butter garlic crab recipe


8. After opening the lid, you will see that the crabs have turned slightly pinkish red in colour.

9. Add salt to taste n crushed pepper.
Cook till the crabs are dry, add a dollop of butter if you wish.


10. Garnish with finely chopped spring onions or parsley. Enjoy this finger licking dish with all your fingers and all your senses.


Monday, 11 March 2019

Amritsari Sookhi Moong Dal Recipe

Hello Friends,

Today let's cook Amritsari Sookhi Moong Dal. This dish is a traditional dish cooked up in North Indian homes as a main dish,  It is truly delicious and highly nutritious Punjabi recipe. A quick and easy-to-make dish that is best enjoyed with a hot chapati or a plain paratha.

Amritsari Sookhi Moong Dal

Amritsari Moong dal is light on the tummy too. The best thing about this easy recipe is that you can make it in just half an hour. You can also pack this yummy dish for your kids in tiffin. Try it!

Need to soak it for just half an hour, cook with red chillies, onions, tomatoes, and a few common spices like ginger, red chili powder and cumin seeds, which are easily available in your kitchen. Voila!! Amritsari Sookhi dal is ready


Ingredients

200 gms soaked Moong Dal
2 tbsp ghee
1 tsp cumin seeds
2 sliced onion
3 small  chopped tomato
A pinch of  asafoetida ( hing)
2 -3 whole red Kashmiri chillies
1 small piece of ginger
5 cups water
1/2 tsp Turmeric powder
1/2 tsp red chilli powder
 Coriander leaves for garnish
Salt to taste

Amritsari Sookhi Moong Dal


Method

1. In a saucepan, boil the moong dal with 3 cups of water. Boil along with salt, turmeric powder and grated ginger.

3. Cook on medium flame till the dal gets soft. All the water should be soaked up.

4. Now for the tadka, place a pan on medium flame and add ghee to it. Add cumin seeds when the ghee is hot.

5. Add  chopped onion to this and sauté till the onion is translucent and pinkish in colour.

6. Add asafoetida powder, then  the chopped tomatoes and sauté for 3-4  minutes till the tomatoes are cooked.

7. Now, add red chillies, chilli powder and sauté until the ghee starts to leave the sides of the pan.

8. Add the dal and one cup water. Let the dal simmer with lid on. Let the dal dry but remains whole. Do not blend the dal.

9. Stir fry the dal for a few seconds and transfer into a serving dish.


10. Garnish with chopped coriander leaves and serve hot with parathas and sliced onions.

Time to enjoy Amritsari Sookhi Moong Dal with family.


Top post on IndiBlogger, the biggest community of Indian Bloggers

Saturday, 2 February 2019

Indian Spiced Sweet Potato Patties

Hello friends,
I am back with another simple yet delicious winter recipe today.
Sweet Potato is eaten with relish by kids and adults. The sweet taste and texture is similar to a potato. This makes it so likeable. Sweet potato is especially seen in abundance during the winter season. The carts that sell roasted sweet potato is a common sight on street corners, just as the corn on the cob carts are, during monsoons.


Sweet potato patties


Sweet potatoes are low in sodium and are a very good source of fibre,  carbohydrates, proteins, calcium and vitamins. It makes a healthier alternative to potatoes. Today, I experimented with sweet potato to create a patties/tikki.


This one is quick and easy to prepare, can be served as an healthy evening snack. Serve it with a combo of green chutney, tomato sauce, mayo, or curd dip. Any which way, it will only enhance the taste further.

Ingredients

One kg sweet potatoes
1 tsp garam masala
1 green chilly (finely chopped)
1 tsp coriander powder
1 small onion ( finely chopped) This is optional
1 tsp  black pepper powder
A few chopped coriander leaves
Juice from one lime
2 bread slices
Salt to taste
Oil for shallow fry


Method


1.  Wash the sweet  potatoes  thoroughly. Place the unpeeled potatoes in a pressure cooker. Add two cups of water and close the lid. Pressure cooker this for 3 whistles over high heat. Cook until potatoes are soft and tender.

2. Now drain, cool, and peel potatoes.

3. Put the potatoes in a large bowl. Add onion, salt, garam masala, coriander powder, pepper, chopped green chilly, and coriander leaves.

4.  Mash the sweet potatoes by hand or with a large fork. See that no lumps are formed.

5. Now take the bread slices and add to a bowl of  water, squeeze out the water and then add to the sweet potato mixture.

6. Shape the potato mixture into flat round or oblong  patties.
Maximum  2 or 3 inches in diameter.

7. In a frying pan, heat a little oil over medium heat.

8. Fry the sweet potato patties until golden brown on both sides.

9. Add oil if need be for the next batch of cutlets while frying. As sweet potato is already cooked you don't need to deep fry.

10. Now serve this with ketchup, mayo or chutney.

sweet potato patties


Note

You can serve it at meal time as a side dish.

Or make a toasted sandwich with green chutney and sliced tomato in addition to the cutlet filling.  This tastes delightful.


Sunday, 14 October 2018

Spicy homemade Paneer 65 recipe

Hello friends, 

Many of my friends have given up non veg food and have turned vegetarian without any regret. Then I wonder are they getting enough protiens from vegetarian sources? 
Cottage cheese/ Paneer is a type of cheese that is high in nutritive value. It is rich in calcium. 


Paneer 65


Today I tried to cook up a southern style Paneer 65 with a zesty chilli / curry leaves flavour. Hope my vegetarian friends will find this recipe interesting. 


Ingredients 

250 gms Paneer
2 Green chillies
1 finely chopped onion
1 tsp ginger garlic paste
2 sprigs Curry leaves
1 tsp red chilli powder
1/2 tsp garam masala
1 tbsp Rice flour
Salt to taste.
2 tbsp curd
1 tbsp fresh cream
1 juice of lemon
Corriander leaves
2 tbsp oil


Method

1. First cut  the paneer into small pieces.

2. Take a mixing bowl, to make the marinade.

3. Add rice flour, curd, cream, ginger garlic, red chili powder,  garam masala, and pinch of salt. Mix well and set aside.

4. Mix it gradually add little water if required to make a thick yet flowing batter. The batter should not have lumps.


5.Mix in the paneer cubes so that all the pieces are coated well with the masala and let it sit in the marinade for minimum half an hour.

5. Now heat 2 tbsp oil in a pan The oil should be medium hot.


6. Add curry leaves and slit green chillies and let it splutter. Now add onions and sauté till pinkish.

7. To this add the paneer pieces. Gently mix and see that paneer doesn't stick to bottom.

8. Now add the lime juice.

9. Cook further till all water evaporates.

10. Garnish with corriander leaves and serve hot like a starter or with roti as a main dish.

Paneer 65


Note

This same dish can be made with gram flour instead of rice flour

You can also deep fry the cubes instead of sauté.

The paneer can even be toasted in the oven for zero oil usage.

You can avoid onions if you wish.


Thursday, 9 August 2018

Spicy Corn Curry | Corn on the cob curry 

Hello Friends,

We always associate savouring corn on the cob on a rainy day. That wet chilly feeling combined with the comfort of a hot spicy butta is an incomparable feeling. The sights and sounds of the local hawker roasting  corn on the cob is so delightful. One just cannot wait to enjoy corn on the cob smeared with lime and chilly powder.


This season I bought some American Corn cobs home from a local market. Enjoyed it simply by boiling the cobs in the pressure cooker and adding butter with few spices. However still having a few cobs left over I decided to stir up a spicy curry with ingredients available at home.


Ingredients


2 corn on the cob
1 medium onion
2 large tomatoes
 I tbsp cooking oil
2-3 kashmiri chilies
1 tsp ginger-garlic paste
2 tsp Kasturi Methi powder
1/2 tsp turmeric powder
1/2 tsp corriander powder
Salt to taste
Coriander for garnish


Method


1. Chop the onion, tomato and keep aside.

2. Now pressure cook the corn on the cob for 7-10 minutes. Set aside for cooling. Later make each cob into four pieces.

3. In a kadhai or heavy bottom pan, heat oil. Add onions, red kashmiri chillies,and ginger garlic paste and sauté till the onions are golden brown.

4. Now add the tomatoes and cook till the tomatoes get soft and pulpy.

5. Add this paste to a mixer grinder and puree to make a paste.

6. Put thishis back to the kadai, add kasturi methi, dry spices and salt to taste.

7. Add the boiled corn and sauté for 5 minutes.


8. Now 2 cups of water and cook uncovered for 5-8 minutes till you have a thick gravy.

9. Garnish with coriander leaves.

10. Serve the dish with hot rotis or steamed rice and sliced onions.


Note


Do not add any garam masala.
You can add sugar if you desire a sweet/sour taste.
If Kashmiri chillies are not available you can add chilly powder.

Top post on IndiBlogger, the biggest community of Indian Bloggers

Saturday, 4 August 2018

Perfect non-sticky Sabudana Khichdi

Hello Friends,

Sabudana or tapioca pearls as its called in English is a starch extract from the tapioca root. It is processed  further to make spherical pearl like balls better known as sabudana.

Sabudana has a high cooling effect and can be easily digested. Sabudana khichdi is a very popular breakfast food in India. It is also eaten during fasts with  a dollop of chilled curd.

Top post on IndiBlogger, the biggest community of Indian Bloggers

How does one make a perfect  non sticky sabudana khichdi is always a tricky  question. Isn't it?

So let's get straight into this easy recipe and learn some tricks to make a non sticky sabudana khichdi.


Trick


Do not over soak the sabudana, just half an inch above the level of sabudana. First  wash the pearls under cold tap water. Wash till the water gets clear and all the sticky starch is removed. And before cooking strain well. This should do the trick for a perfect khichdi.


Ingredients


1 cup sago (sabudana)
1/2 cup roasted peanuts
10-12 curry leaves
1 large potatoes
1/2 tsp cumin seeds (jeera)
1 chopped green chillies
Coriander for garnish
2 tbsp oil
Salt to taste


Method


1. Wash and soak the sabudana the same way explained in the trick. 

2. Drain and keep aside for about 2 hours. If necessary, sprinkle a little water over the sago to keep it moist.

3. Peel the potato and chop it into tiny cubes. 

4. Roast the peanuts and then grind coarsely in a mixer.

5. Take a kadai or frying pan, add oil to it and let it heat up.

6. Add curry leaves, cumin seeds and chopped green chilly. Cook till potatoes are soft.

7. Now add peanuts and drained sabudana. 

8. Make sure not to mash the sabudana. Cover and cook for 2 minutes till sabudana get cooked. 

9. Add salt and mix well. Cook till the sabudana get translucent.

10. Now garnish with coriander and serve it hot at teatime.


Sunday, 22 July 2018

Indian Prawn Curry Recipe

Hello friends,

How are you doing? I know  it's been a long time since I have shared an easy recipe for you all. The wait is over today. Adding to my easy Sunday cooking recipes is prawn curry. This reddish thick prawn curry is comfort food in every Parsi household. I remember my Bapaiji (grandmother) cooking up prawn curry, especially how she would wash they prawns in vinegar and channe ka atta to remore the fishy smell from it. This recipe is a different one, not the one she used to make.


Parsi prawn curry

The main battle is won when you have made the curry masala. I promise to share some easy tips for you all at the end of the recipe. This is a very easy recipe for a tasty, light, flavoursome prawn curry, if you're looking for an easy Sunday.


Ingredients 

1 cup prawns
2 medium onion
6 cloves garlic
1 piece of ginger
Few whole dry spices

2  medium tomatoes 
6-7 fresh curry leaves 
3-4 whole Kashmir red chillies
1/2 cup grated fresh coconut 
2 bay leaves 
1 tsp mustard seeds
1 tbsp dark vinegar 
1 tsp coriander powder
1/2 cup of coconut milk

1/2  tsp garam masala powder
1/2 tsp turmeric powder 
2 tsp oil 
Salt to taste


Method

For Prawns


1. Peel the shells and head from the prawns, with the pincer grip gently pull out the black thread from the opening near the head. This is called deviening. Wash it with salt water to take out the fishy smell. 

For Masala
 
2. First roast all the masalas  before grinding. I do it one day before so Sunday cooking is easy. 
Heat oil in a large, deep frying pan. Add the onion and cook over medium heat until soft and golden. Add the garlic and ginger and cook for 1 minute. Add whole red chilies, grated coconut, dry whole spices and cook for another minute, or until fragrant.
Once cool, dry grind this in a mixer- grinder adding a little water and the vinegar.


For making the curry

3. Take one tsp oil in a deep bottom dish, add mustard seeds and let it splutter. Tip in the ground masalas, curry leaves and bay leaves and roast for 4-5 minutes on medium flame. See that the colour of the paste changes slightly. 

4. Now add the prawns and tomato to the pan and simmer for 10–15 minutes, or until the prawns are cooked and the liquid has reduced.

5. Add dry spices like turmeric powder, garam masala powder and salt at this stage. 


6. Lastly stir in the coconut milk and let it simmer for two minutes.


7. Now
serve scattered with the coriander and a hot pot of steamed rice or even Jowar rotla. Slice up some onions and dont forget a dash of lime.
Khavanu, Pivanu, Majeni Life


Note


* Prawns cook fast, if over cooked they turn rubbery. Any sized prawns will do.
* You can cook the same recipe with without coconut milk.
* Leave the heads of the prawns on, if desired. The curry gets more flavour and the dish is tastier. However dont serve prawns with heads if you having guests. 

* Make a big batch of Curry Masala. This can be prepared and stored in the deep freeze to save cooking time. 
* Try tamarind and a dash of vinegar to the curry for another variation. 


Now all there is left is to sum up this post quickly and get back to the lunch table.

Bon Apitit
Happy Sunday


Top post on IndiBlogger, the biggest community of Indian Bloggers

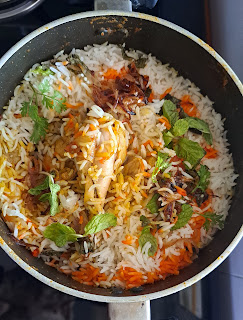
Easy One pot Chicken Biryani

  Easy One pot Chicken Biryani  No fuss steps infact a one pot preparation with a flavourful outcome!  "Fall in love with the irresisti...